
How to Tell If Your Home Has Hidden Water Leaks Before They Cause Damage
Learn how to spot hidden water leaks with a two-hour meter test, toilet dye test, room-by-room inspection, leak calculations and practical repair priorities.
Contents
- The 10 warning signs of a hidden water leak
- First, run the no-water-use meter test
- Calculate how much water a slow leak could waste
- The 10-minute toilet dye test
- A room-by-room hidden-leak inspection
- Kitchen: sink cabinet, dishwasher and refrigerator
- Bathroom: shower, bath, toilet and tiles
- Laundry room and water heater
- Ceilings, walls, windows and loft/attic
- Basement, crawl space and exterior
- How to distinguish a pipe leak from condensation or rainwater
- When a hidden leak is an emergency
- What to do in the first 24 hours after finding a leak
- Mold and moisture: why drying matters
- Leak-detection tools: what is worth using?
- A worked example: tracking a leak without opening a wall
- A monthly 15-minute prevention routine
- US and UK considerations
- When to call a plumber instead of continuing DIY tests
- The bottom line
- Official sources and further reading
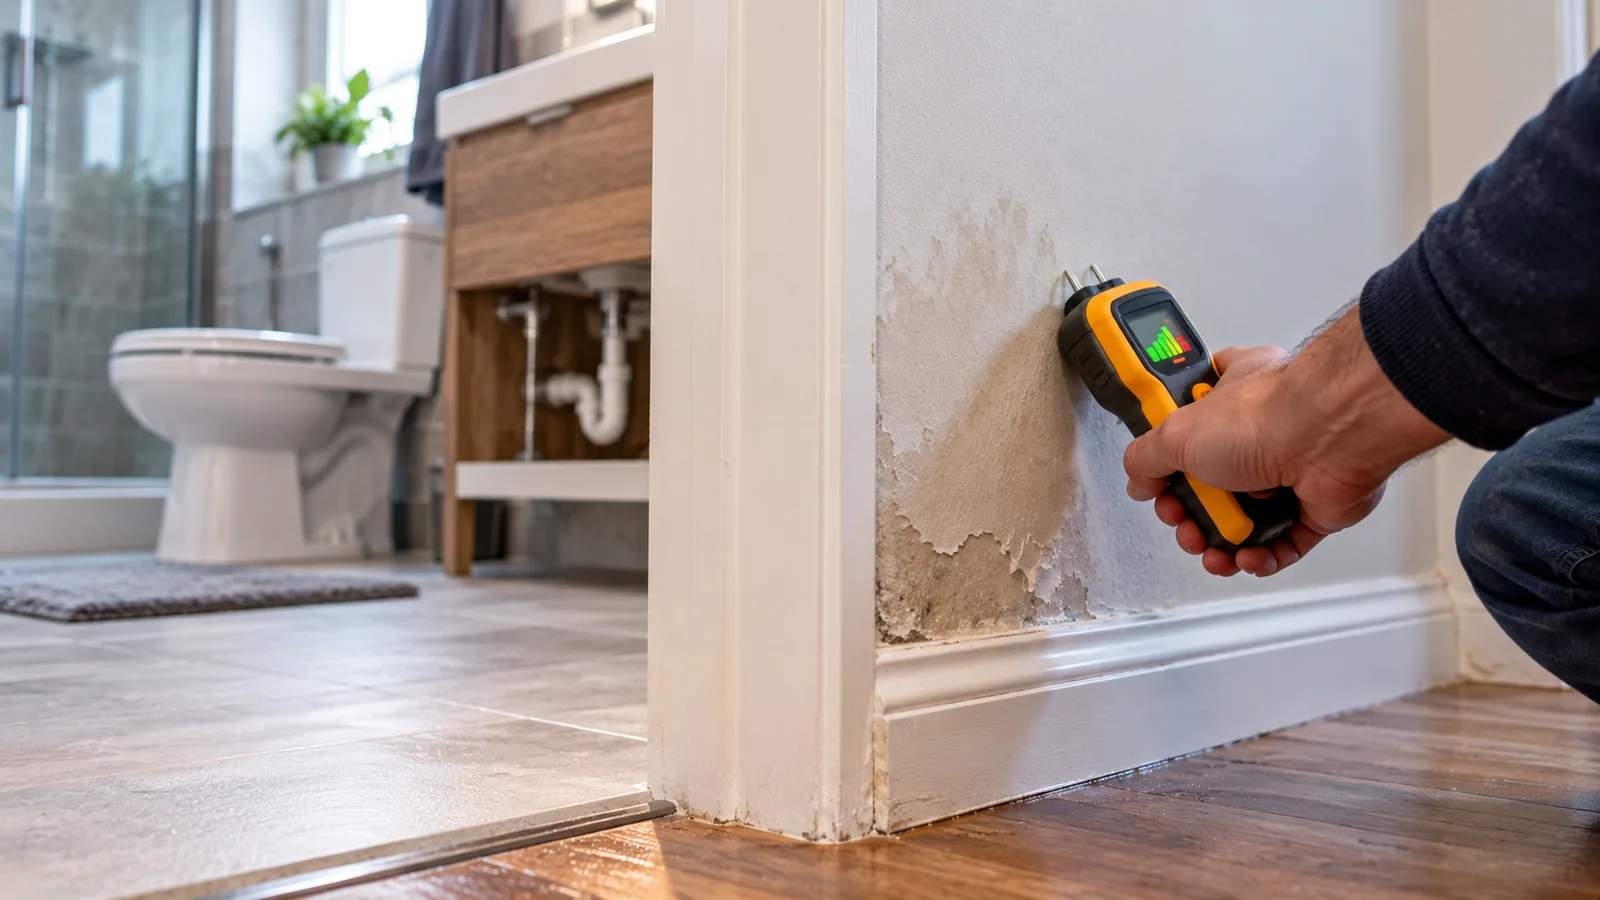
A hidden water leak can damage a home long before you see a puddle. A slow toilet leak may silently raise your water bill; a loose dishwasher supply connection can wet a cabinet for weeks; a concealed pipe leak can stain a ceiling or soften flooring. The fastest way to narrow down the problem is to separate water-meter evidence from moisture clues—then work systematically from the water supply to appliances, drains, roofs and condensation.
Start with safety. If water is near outlets, a breaker panel, light fixtures or exposed wiring, keep clear and arrange safe isolation by a qualified professional. If a ceiling is sagging or water is pouring in, avoid the area, shut off the appropriate water supply if safe and call an emergency plumber or relevant building professional. Do not cut into walls or ceilings to investigate a suspected leak without checking for electrical, structural and other hazards.
The 10 warning signs of a hidden water leak
- An unexplained water-bill increase. Compare the same season year over year, accounting for guests, irrigation and rate changes.
- A meter that advances when nobody is using water. This suggests water passing through the metered supply, although the source still needs investigation.
- Musty smells or recurring damp patches. Odor can precede visible damage; it does not identify a particular pipe.
- Paint bubbling, peeling wallpaper or swollen skirting/baseboards. Moisture can weaken finishes and materials.
- Soft, warped or cupped flooring. Especially around sinks, bathrooms, laundry rooms and water heaters.
- Stains on ceilings or walls. Their location may be offset from the leak because water travels along framing.
- Unexpected sound of running water. Check that toilets, ice makers, irrigation and water-treatment equipment are not cycling.
- A toilet that refills intermittently. A leaking flapper can waste water without an obvious drip.
- Lower water pressure or persistent damp ground. These can suggest supply or underground problems but have other explanations.
- Mold growth that returns after cleaning. Find and fix the moisture source rather than repeatedly painting over it.
No single clue proves a hidden pipe leak. Rainwater penetration, condensation, plumbing drains and HVAC condensate can create similar staining. Conversely, a supply leak may be detectable on the meter before any visible damage appears.
First, run the no-water-use meter test
The US Environmental Protection Agency recommends comparing water-meter readings across a two-hour period when no water is used. If the reading changes, a leak is likely. The procedure below adds controls to reduce false alarms, but it is a screening test, not a certified plumbing inspection. EPA WaterSense home maintenance guidance.
- Locate your water meter and confirm which meter serves your property. In the US it may be near the curb or in a basement; in the UK it may be in an external boundary box or indoors.
- Tell everyone not to run taps, flush toilets, shower, use the washing machine or dishwasher, or irrigate during the test.
- If practical, disable automatic water-consuming cycles such as irrigation, water softener regeneration and ice-making; follow appliance instructions.
- Photograph the meter display, including every decimal and the units (US gallons, cubic feet or cubic metres).
- Wait two hours without using water. Photograph the display again and subtract the first reading from the second.
- If it advanced, repeat under controlled conditions and investigate fixtures, appliances and irrigation. A plumber or your water utility can help interpret uncertain readings.
Important limitation: a stable meter does not rule out a roof leak, rain intrusion, shower-drain leak, condensation or an intermittent supply leak. Nor does an advancing meter prove the pipe is inside the wall; toilets and outdoor irrigation are common culprits.
Calculate how much water a slow leak could waste
For a meter that records cubic metres, multiply the difference by 1,000 to convert to litres. For a US gallon meter, the difference is already in gallons. If a measured 0.06 m³ passes in two hours while nobody uses water, that is 60 litres in two hours, or an average 30 litres per hour. If—and only if—the flow were continuous at that same rate for 24 hours, the theoretical loss would be 720 litres per day.
For a US meter showing 4 gallons in two hours, the corresponding constant-rate estimate is 48 gallons in 24 hours (4 ÷ 2 × 24). These are arithmetic examples, not measured results from a home. Intermittent toilet or irrigation leaks can vary widely, so avoid treating a short test as a precise monthly prediction.
| Meter result | What it suggests | Next check |
|---|---|---|
| No movement over two hours | No continuous metered flow during test | Check intermittent use, drains, rain and condensation |
| Movement stops after toilet supply isolated | Toilet or its supply is likely involved | Run the dye test and inspect fill valve |
| Movement persists with indoor fixture valves closed | Could be concealed line, outdoor branch or other equipment | Identify branch valves; call a plumber |
| Meter runs with whole-house stop valve closed | Location depends on valve and meter arrangement | Contact utility/plumber; avoid assuming who owns the line |
The 10-minute toilet dye test
Silent toilet leaks are easy to miss. EPA WaterSense recommends putting a few drops of food coloring into the toilet tank, waiting about 10 minutes without flushing and checking whether color appears in the bowl. If it does, the flapper or flush-valve seal may be leaking. Flush immediately afterward to avoid staining. EPA Fix a Leak Week.
- Remove the tank lid carefully and place it somewhere stable.
- Add a few drops of food coloring to the tank water, not the bowl.
- Do not flush for 10 minutes.
- Look for colored water in the bowl. If present, inspect the flapper, flush valve and fill mechanism or ask a plumber.
- Flush to clear the dye and repeat the test after repair.
If the toilet intermittently refills, check whether water is trickling into the overflow tube. Do not force or overtighten fragile plastic parts. Toilets with concealed cisterns may require manufacturer-specific access; if you rent, report the fault rather than dismantling the fixture.
A room-by-room hidden-leak inspection
Kitchen: sink cabinet, dishwasher and refrigerator
Empty the cabinet under the sink and use a torch to examine supply hoses, shutoff valves, the tap base, waste trap and cabinet floor. Press a dry paper towel around accessible joints, then briefly run hot and cold water while watching for new dampness. Moisture only when the sink drains points more toward the waste side; moisture when no tap runs suggests a supply or condensation issue. Do not disconnect pressurised hoses to test them.
Check around the dishwasher toe-kick and the refrigerator ice-maker line if fitted. A dishwasher leak may appear only during a wash or drain cycle; an ice-maker leak may be intermittent. If there is active leakage, stop using the appliance, shut off its accessible water supply and arrange service. Keep electrical components dry.
Bathroom: shower, bath, toilet and tiles
Look for soft flooring near the toilet base, swollen trim, damaged grout and staining on the ceiling below. A loose toilet wax ring or pan connector can leak only during flushing; a shower drain or failed waterproofing membrane may leak only when showering. A water-meter test may stay unchanged for a drain or shower-waterproofing leak because the water was intentionally used before escaping.
A small patch of damp grout does not by itself prove the waterproofing has failed. Avoid invasive tile removal until a professional has checked accessible connections and established a plausible leak path. In an upstairs bathroom, document exactly which activity precedes moisture below.
Laundry room and water heater
Inspect visible washer supply hoses for bulges, cracks and damp couplings, plus the drain hose for displacement. Check the water heater base, pipe joints, pressure-relief discharge route and surrounding floor. Some relief-valve discharge indicates a condition requiring professional assessment; do not cap or obstruct the discharge pipe. If a hot-water cylinder or heater is leaking, follow the manufacturer’s shutoff guidance and contact a qualified technician.
Ceilings, walls, windows and loft/attic
Photograph the size and outline of stains and note whether they grow after rain, showering or overnight. Roof and flashing leaks can travel along rafters before appearing elsewhere. Damp around windows can be rain penetration or condensation. An attic inspection may reveal wet insulation, but do not step off safe walkways or approach electrical wiring. Hire a roofing professional for roof work.
Basement, crawl space and exterior
Look for damp foundation edges, wet soil, standing water, deteriorated insulation, unusual vegetation growth and persistently muddy spots when it has not rained. A wet basement after heavy rain may reflect drainage or groundwater rather than a pressurised water pipe. Outdoor irrigation, hose bibs and buried service lines can also leak; compare water-meter readings with irrigation zones off and on when safe.
How to distinguish a pipe leak from condensation or rainwater
| Observation | More consistent with | Useful next step |
|---|---|---|
| Meter advances with all use stopped | Metered supply leak or running fixture | Isolate toilets and accessible branches |
| Patch grows only after rainfall | Roof, window or exterior water entry | Inspect drainage, flashing and seals |
| Patch grows after showering | Drain, seal or waterproofing issue | Stop shower use and document timing |
| Moisture appears on cold pipe in humid air | Condensation | Check ventilation and pipe insulation |
| Stain persists despite no meter movement | Intermittent leak or non-metered source | Repeat tests and consider professional moisture survey |
These patterns are suggestive, not definitive. A professional may use non-invasive moisture mapping, thermal imaging or pressure testing to narrow down the source. A thermal camera measures temperature differences rather than water itself: sunlight, heating pipes and insulation gaps can create misleading images. A moisture meter also needs material-appropriate interpretation and a dry reference reading.
When a hidden leak is an emergency
- Water is contacting electrical equipment or flowing through a ceiling light: stay clear and obtain professional help.
- A ceiling is bulging, sagging or dropping debris: keep people away from the area.
- A supply line has burst or water is rapidly spreading: shut off the appropriate valve if safe and call an emergency plumber.
- There is sewage backing up: avoid contact, stop using affected fixtures and seek qualified assistance.
- A wall or floor is becoming unstable, or there is extensive mold or dampness affecting vulnerable occupants: arrange urgent professional assessment.
Know the location of your main water shutoff before a leak happens. In many US homes it is near the incoming service line; UK homes typically have an internal stop tap, often under the kitchen sink, though locations vary. If the valve is stuck, do not force it. Residents of flats and apartment buildings should follow building-management procedures for shared services.
What to do in the first 24 hours after finding a leak
- Stop the source if you can do so safely: close the fixture valve or main stop tap.
- Protect people and electricity: avoid wet electrical areas and unstable ceilings.
- Document before cleanup: photograph the meter, damaged materials, dates, affected rooms and any visible leak.
- Contact the appropriate professional: plumber, building manager, roofer or appliance service, depending on the suspected source.
- Remove standing water promptly and arrange safe drying. Porous materials may need professional assessment.
- Notify your insurer or landlord promptly where relevant; policies and reporting deadlines vary. Do not assume every leak is covered.
- Verify the repair: repeat the meter test where relevant and monitor the affected area for new moisture.
Mold and moisture: why drying matters
Fixing the pipe is only part of the job. Water trapped under flooring, behind cabinets or in wall cavities can keep materials wet after the visible leak stops. The US EPA advises controlling moisture as the key to mold prevention and generally drying water-damaged areas and items within 24–48 hours where feasible. The correct remediation approach depends on contamination, material type and extent of damage. EPA guide to mold, moisture and your home.
Do not paint over wet or moldy surfaces as a substitute for correcting the source. People with respiratory conditions or immune vulnerabilities may need additional precautions. Sewage or floodwater contamination warrants different handling from a clean-water leak; seek qualified help.
Leak-detection tools: what is worth using?
| Tool | What it detects | Key limitation |
|---|---|---|
| Existing water meter | Unexpected metered water consumption | Misses roof, drain and condensation problems |
| Toilet dye test | Water escaping tank into bowl | Only checks that toilet failure mode |
| Battery moisture alarm | Liquid reaching sensor contacts | Detects only where sensor is placed |
| Smart flow monitor | Abnormal supply flow patterns | May need plumbing work and configuration |
| Pinless moisture meter | Relative moisture-related readings in materials | Material and metal can distort readings |
| Thermal camera | Surface temperature patterns | Cannot prove water is present |
For households with a history of leaks, a small water alarm near the washer, water heater or under a sink can provide an early warning. A smart flow monitor may flag unexpected consumption or operate an automatic shutoff, depending on the model and installation. EPA WaterSense provides a guide to leak detection and flow monitoring devices, including their capabilities and maintenance needs. EPA leak-detection guide.
A cheap sensor is not a guarantee: its battery can fail, the leak may occur somewhere else, and some connected devices depend on Wi-Fi or cloud services. Test alarms according to the manufacturer’s instructions and check batteries or connectivity regularly.
A worked example: tracking a leak without opening a wall
Suppose a homeowner notices a water bill 25% higher than the comparable month last year. First, they confirm that the billing period and tariff did not change and there were no extra guests or irrigation cycles. Then they perform a controlled meter test: the reading advances 0.02 m³ over two hours, equal to 20 litres. The result supports investigating metered water use, not yet a hidden pipe failure.
Next they isolate the toilet supply valves one by one during shorter follow-up checks. With one toilet isolated, the meter no longer advances during the same conditions. A dye test then shows colored water reaching the bowl. This hypothetical illustration points toward a toilet flush-valve problem; it is not a real case study, and an intermittent fault may require repeated observation. The useful lesson is to rule out accessible, inexpensive causes before paying for destructive wall inspection.
A monthly 15-minute prevention routine
- Look under kitchen and bathroom sinks for dampness, swelling and corrosion.
- Inspect around the dishwasher, washer and water heater for new moisture.
- Listen for a toilet refilling when no one has flushed.
- Check any leak alarms and verify they are functioning.
- Review unusual water usage and compare with similar seasons.
- Look for new stains near ceilings, windows, plumbing chases and exterior walls.
- Make sure household members know where the main shutoff is located.
Run a toilet dye test periodically and a full two-hour meter check when bills rise or you suspect hidden use. In freezing climates, protect exposed plumbing in line with local guidance and the system manufacturer. Replace damaged hoses and fittings through an appropriately qualified person.
US and UK considerations
In the United States, the utility water meter and property shutoff locations vary by city and home design. Your water utility may offer high-usage alerts, leak adjustments or smart-meter history; ask for its specific rules. WaterSense guidance is a useful national starting point, but local plumbing codes and ownership of the service line differ.
In the United Kingdom, a water meter may be inside the property or in an external chamber. If you suspect a leak, contact your water supplier for advice about its meter and the boundary between its assets and customer-owned pipework. A leakage allowance may exist under a supplier’s policy but is not automatic. For rented homes, promptly report suspected leaks to the landlord or managing agent and document communications.
When to call a plumber instead of continuing DIY tests
Call a qualified plumber if the meter repeatedly advances despite controlled non-use and you cannot isolate a fixture, if water is behind finished walls or floors, if a hot-water system or buried pipe is involved, or if damage is spreading. Request a clear explanation of the diagnostic method and a written record of findings. For an apartment or shared building, contact management before isolating shared supply.
Avoid companies that promise to locate every leak with a single camera scan. Good diagnosis combines history, meter data, visual inspection and appropriately selected tests. Non-invasive tools can narrow down a problem, but sometimes limited access is still necessary to confirm and repair it.
The bottom line
The most useful first check is the water meter when all water use has stopped. Follow it with the 10-minute toilet dye test, a careful room-by-room inspection and a comparison of when dampness appears. A moving meter points toward metered water consumption; a dry meter does not exclude drains, rain or condensation. Address active leaks promptly, document damage and use qualified help for electrical hazards, concealed plumbing and major water intrusion.
Official sources and further reading
- US EPA WaterSense — Home maintenance and leak tests
- US EPA — Fix a Leak Week
- US EPA — Leak detection and flow monitoring
- US EPA — Homes Technical Reference Manual
- US EPA — Mold, moisture and your home
Safety note: This article is educational. It does not replace an on-site plumbing, electrical or structural assessment. Stop work and obtain professional help where hazards are present.
You may also like
 Home & Living
Why Do Ceiling Fans Collect Dust Even When They Are Spinning?
A physics-backed explanation of dust buildup on spinning ceiling fan blades, plus safe cleaning methods and practical ways…
 Home & Living
How to Make a Bubbling Halloween Cauldron Safely: Fog Effects and Simple Alternatives
Create an impressive Halloween cauldron with dry ice outdoors, a water mister, or no-fog LED effects. Compare options,…
 Home & Living
Why Your Heating System Turns On and Off Too Frequently — Causes and Fixes
Learn when heating short cycling is normal, how to diagnose frequent furnace or boiler starts safely, and when…