
iPhone Security Delay: Why You Must Wait an Hour—and What to Do
See why iPhone Security Delay appears, how to complete the one-hour process, why it can happen at home, and how account recovery differs.
Contents
- First, identify which kind of wait you are seeing
- Why is there a Security Delay on my iPhone?
- Check Away from Familiar Locations versus Always
- How to complete the one-hour Security Delay
- If the hour has passed but you still cannot finish
- If Face ID is the part that fails
- Account recovery is a separate waiting period
- Selling or trading in? Prepare before the appointment
- If your iPhone is actually lost or stolen
- Sources and image credits
iPhone Security Delay requires a biometric check, a one-hour wait, then another biometric check before you complete a protected change. The hour ending does not automatically change your password. Apple’s iPhone User Guide explains the sequence. Plan time for the whole task, including its final confirmation.
Start by identifying the message and the action you were trying to complete. A delayed password change, a failed Face ID check and account recovery need different responses. This guide follows Apple’s published instructions; the settings image is an official reference illustration, not a countdown captured during a hands-on test. Sources checked on 1 November 2026.
First, identify which kind of wait you are seeing
| What you see | What to check next |
|---|---|
| Security Delay while changing a protected setting | Follow the biometric → wait → biometric sequence. Check the location option below. |
| An account recovery request with a future date | Use Apple’s account recovery instructions, not the one-hour procedure. |
| Face ID fails before you can proceed | Troubleshoot recognition or seek service; waiting alone does not diagnose the camera. |
| A different lockout or restriction message | Record its exact wording. Do not assume every timed message is Stolen Device Protection. |
A useful note is “I selected Sign Out and was shown Security Delay,” rather than “my Apple Account is blocked.” The first description identifies an action and a screen; the second can send you down an unrelated recovery route. Keep that distinction when searching for help or explaining the problem to support.
Why is there a Security Delay on my iPhone?
The feature helps protect you if someone steals your iPhone and knows its passcode. Apple lists delayed actions including changing your Apple Account password or device passcode, signing out, modifying account security, adding or removing biometrics, resetting all settings, and turning off Stolen Device Protection. Other protected actions require biometrics without the hour-long wait; not every Face ID prompt starts a timer.
Do not infer that your phone has been stolen just because the screen appears. The useful question is whether you initiated a protected change. If you did, treat the message as part of that task and check the selected protection setting. If the phone is actually missing, use the lost-device steps later in this guide.
Check Away from Familiar Locations versus Always
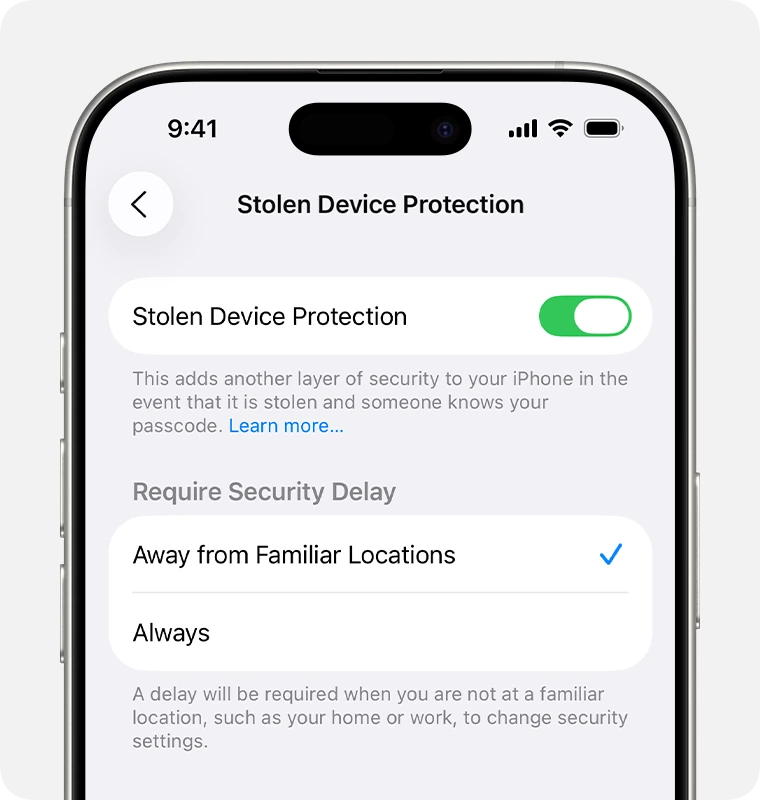
Open Settings → Face ID & Passcode (or Touch ID & Passcode), enter your device passcode, then open Stolen Device Protection. Under Require Security Delay, inspect the selected option. Apple’s Personal Safety guide describes these choices:
- Away from Familiar Locations: the extra requirements apply away from places your iPhone recognizes as familiar, such as home or work.
- Always: the additional requirements apply everywhere, including home and work.
If Always is selected, going home does not make the delay unexpected. Choosing whether to retain that setting is a security preference, separate from completing the task already in progress. Turning protection off removes this extra layer; Apple also says Find My cannot be turned off while Stolen Device Protection is enabled.
On a restored or newly transferred iPhone, protection settings can carry over, and recognition of familiar locations may take time. Apple says a delay may end early when the phone detects arrival at a familiar location, but this is not a guaranteed shortcut. It does not override Always. The same support document describes these location-dependent behaviours.
How to complete the one-hour Security Delay
- Open the protected change you intended to make and read its prompt.
- Select Start Security Delay if prompted and complete Face ID or Touch ID.
- Wait for the period displayed on your device to end.
- Return to the requested change and complete the second biometric check as instructed.
- Finish the remaining prompts and verify the result. For example, check that the intended setting shows its new value.
These steps apply the documented sequence. A planning example: leave time after an 11:00 appointment reminder to finish any remaining prompts. Set the reminder for returning to the task, not for declaring it complete. This is scheduling advice, not a measured test or a guaranteed completion time.
To disable protection for a legitimate handover, use its switch and follow the prompts. A delay applies outside familiar locations with the Away option, or everywhere with Always.
If the hour has passed but you still cannot finish
Work out which stage failed before starting over. “The timer is still running,” “Face ID fails after the timer,” and “the change did not save” are different observations. Make a short private record of the exact message, the action, the time and your iOS version. A support conversation will be clearer if it starts with those details.
- Check whether the screen is asking for the second biometric confirmation rather than showing an unfinished timer.
- Check whether you returned to the same action you originally requested.
- Note whether Always is selected and whether you recently restored or transferred the phone.
- If another wait appears, record what you did immediately before it. Avoid guessing that every repeated prompt has the same cause.
The official sources linked here do not establish changing the clock, switching a VPN, deleting management profiles or factory-resetting the phone as fixes for this timer. Those changes are not steps in this guide. For a work or school phone, describe any separate policy restriction to its administrator instead of removing profiles as an experiment.
If the documented flow repeatedly fails, contact Apple Support with your notes. Share the message and task, not your passcode, password or verification codes. A recurring failure needs a diagnosis; it is not evidence that a paid “instant bypass” offer will work.
If Face ID is the part that fails
Treat recognition trouble as its own issue. Apple’s Face ID troubleshooting guide recommends checking for software updates, confirming Face ID settings, making sure the TrueDepth camera is unobstructed, and keeping your face visible. A case edge, screen protector or smudge can be worth checking before assuming hardware failure. Face the camera at a normal selfie distance; try without sunglasses if they interfere.
Apple also includes restarting the device and entering its passcode before trying Face ID again as general recognition troubleshooting. That is not a documented way to skip Security Delay. If the camera is not working or setup cannot be completed, Apple says service may be needed. Some protected actions have no passcode fallback, so do not assume knowing the unlock code resolves a biometric failure.
Our Face ID not working on iPhone guide covers the broader recognition and repair checks. For this particular task, tell support that Stolen Device Protection is involved before attempting to change or reset biometric settings.
Account recovery is a separate waiting period
If you cannot sign in and have started account recovery, a one-hour troubleshooting guide is the wrong timetable. Apple’s account recovery guidance says that recovery can take several days or longer. A confirmation email should arrive within 72 hours with the expected date and time. Apple Support cannot shorten the fixed waiting period.
Follow the instructions for your specific request, including what to do with signed-in devices while waiting. Do not submit repeated requests merely to try to accelerate recovery; Apple warns this can extend the wait. Keep the recovery confirmation separate from any Security Delay screenshot so that you do not confuse the two processes.
Selling or trading in? Prepare before the appointment
Build preparation time into the handover. Apple’s sale and trade-in checklist warns that changing a password at the store with Stolen Device Protection enabled is likely to involve a one-hour delay. Know your Apple Account password beforehand and complete any needed reset before travelling.
Back up your information, transfer it to the new phone and follow Apple’s version-specific sign-out and erase instructions before handing over the old one. Do not manually delete synced photos or contacts as a cleanup shortcut: Apple warns this can delete them from iCloud and your other connected devices. Completing a timer is only one part of preparing a phone for its next owner.
For an appointment, write a short checklist of outcomes: backup available, transfer checked, account steps completed and device prepared according to Apple’s instructions. Tick off the actual outcomes rather than treating “waited an hour” as proof the phone is ready.
If your iPhone is actually lost or stolen
Use Apple’s lost-iPhone guidance immediately. You can use Find My on another device or icloud.com/find to try to locate the phone and mark it as lost. Do not wait for an hour-long timer before taking that action. Lost Mode locks the device and suspends Apple Pay cards and passes. Do not remove a stolen device from Find My: doing so removes Activation Lock.
Sources and image credits
- Apple: About Stolen Device Protection for iPhone
- Apple iPhone User Guide: Use Stolen Device Protection
- Apple Personal Safety: Stolen Device Protection options
- Apple: If Face ID is not working
- Apple: What to expect during account recovery
- Apple: Prepare an iPhone for sale, gift or trade-in
- Apple: Find a lost iPhone or iPad
Featured photograph: Vojtech Bruzek / Unsplash, used under the Unsplash License. It is an illustrative iPhone photograph with a blank screen, not a Security Delay screenshot. Settings illustration: Apple Support; shown as a reference with attribution. Interface appearance may vary by iOS version.
You may also like
 Technology
Free Steam Games in November 2026: What You Can Keep and What’s Only a Free Weekend
Verified Steam offers for November 2026: Last Gambit, PAYDAY 3, Age of Wonders 4 and free DLC, with…
 Personal Finance
Why Do Credit Cards Expire? What Happens to Payments and Subscriptions
A practical guide to card expiry dates, replacement cards, recurring payments, balances, automatic account updates and what to…
 Technology
Android Theft Protection: Set Up Remote Lock Before You Need It
Set up Android Remote Lock, understand Identity Check and Find Hub, troubleshoot missing settings, and prepare a practical…